
Engineered vs. Solid Hardwood: Making the Smart Choice for Ottawa’s Humidity
March 26, 2026
Hardwood Floor Staining Guide: Choosing the Right Colour for Ottawa Homes
August 31, 2026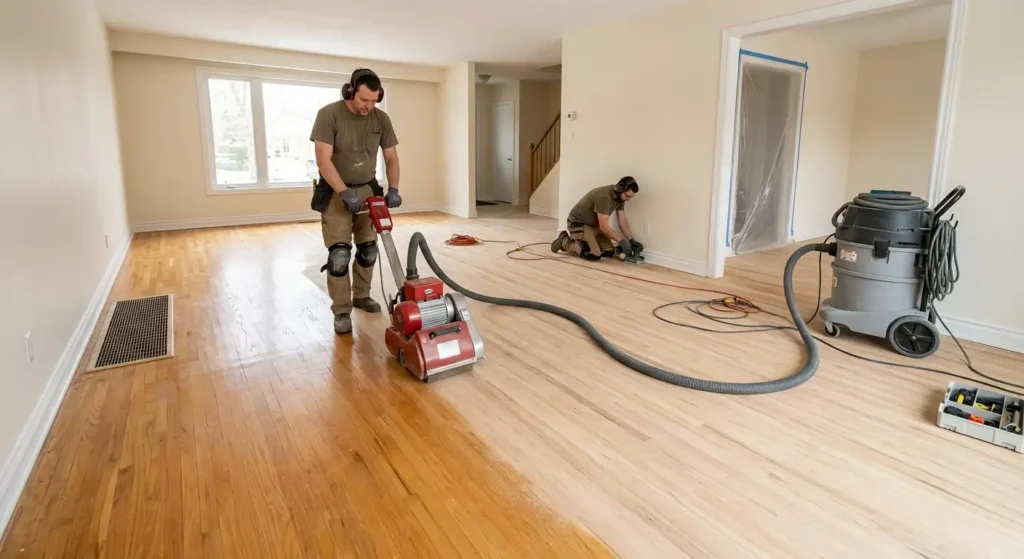
Most homeowners approach sanding with one specific fear, and it isn’t about the floor. It’s about the dust. The image is of a house sealed in plastic, a fine grey film settling on every surface for weeks afterward, and a family living somewhere else until it’s over.
That picture is out of date. Hardwood floor sanding has changed considerably, and modern dust control removes most of what people dread about it. Understanding what actually happens, and how long each stage takes, turns the project from something to avoid into something to schedule.
Why Sanding Is Worth Doing
Sanding is the foundation of refinishing, and refinishing is the reason hardwood outlives every other floor.
Vinyl, laminate, and carpet all eventually reach a point where they must be replaced. Hardwood doesn’t. When the finish dulls, when scratches accumulate, when decades of traffic have worn a path from your front door to the kitchen, you sand it back to bare wood and start again. Sanding and refinishing is a considerably less expensive alternative to laying a new floor, and it works on oak, maple, birch, parquet, and pine surfaces alike.
The transformation is usually larger than people expect. A floor that looked tired and grey turns out to have been perfectly good wood hiding under a failed finish, and the results routinely surprise our customers more than any other flooring work we do.
The Four Passes
Sanding isn’t one action. It’s a sequence, and each pass has a different job.
Preparation
The room is cleared completely, with furniture out, curtains down, and anything on the walls removed. Doorways are sealed to isolate the work area, vents are covered, and the floor is checked for protruding nails, loose boards, and any repair work that must happen before the sanders come out. Skipping this stage is how a nail head destroys an expensive abrasive belt and gouges the floor beneath it.
The Cut Pass
The first pass is the aggressive one. A large drum or belt sander with a coarse abrasive removes the old finish entirely and levels the surface, taking your floor from finished to bare. Edges and corners, which the large machine can’t reach, get handled separately with an edger.
Intermediate Passes
The floor is worked through progressively finer abrasives, with each pass removing the scratch pattern left by the one before it.
This is the part that can’t be rushed, and it’s the difference between a floor that looks flawless and one that shows sanding marks the moment light hits it at an angle. Skipping a grit to save time always shows.
The Final Pass
A fine abrasive, often with a buffer rather than a drum, brings the surface to its final smoothness. The floor is vacuumed thoroughly and tacked, and at that point the wood is bare, open-grained, and ready to accept stain or finish.
Dust Control: What Has Actually Changed
This determines whether you can live in the house during the work, so it deserves a proper explanation.
Older sanding methods relied on a bag attached to the machine, which captured some of the dust and released a great deal of it. That’s where the horror stories come from, and they were earned.
We use the latest dust control technologies, which work on a different principle. The sander connects to a powerful containment system that captures dust at the point of creation, before it becomes airborne, so the dust gets pulled directly into a sealed collection unit rather than dispersed into the room.
The result is minimal impact on your other living spaces. It isn’t literally dust-free, and anyone promising you that is overselling, because fine airborne particles always find their way past any system. But the difference between old-style sanding and modern containment is the difference between a house that needs a deep clean afterward and one that needs a wipe-down.
A few things on your end genuinely help: remove or cover anything you care about in adjoining rooms, particularly electronics and open shelving; turn off forced-air heating during the work so the system doesn’t distribute dust through the ducts; and keep interior doors closed rather than propped, even where the doorway is sealed.
How Long It Actually Takes
The sanding itself is fast. A typical room takes a day, and a main floor of moderate size usually runs one to two days including edging and preparation.
What extends the project is what comes afterward. If you’re staining, the stain needs time to absorb and dry before finish can be applied, typically a day. Then the finish goes on in multiple coats, with drying and light abrading between them. Oil-based finishes take longer to cure than waterborne ones and carry more odour, while waterborne finishes dry faster and smell far less, which matters if you intend to stay in the house.
For planning purposes, a straightforward sand and refinish on a main floor is usually a three to five day project from start to walkable. Full cure, the point at which you can put furniture back and lay rugs down, takes longer, often a week or more depending on the finish. Rushing that step is how a brand new floor gets permanently marked.
Our pre-installation checklist covers how to clear and prepare the space before the crew arrives, and it’s worth reading before you book a date rather than after.
When Sanding Isn’t the Answer
Sanding has limits, and it’s worth knowing where they sit.
There’s a finite amount of wood above the tongue on any board, and each sanding removes some of it. A solid hardwood floor can typically take several full sandings across its life, but a floor already refinished three or four times may have run out of material. Once the boards are thin enough that sanding would expose the tongue, you’re looking at hardwood floor repair or replacement instead.
Engineered hardwood has a real wood wear layer over a stable core, and that layer determines how many times it can be sanded. Thicker wear layers take a full sanding, sometimes more than one. Thinner ones can’t take any, so know which you have before anyone starts.
Water damage, deep cupping, and structural movement are also problems sanding can’t fix, because sanding levels a surface without addressing why the surface moved. Hardwood moisture problems need diagnosing at the source, and if your floor shows the signs to replace hardwood floors rather than refinish them, sanding produces a smooth floor with the same underlying fault.
There’s also a sandless option. Where the finish is worn but the wood beneath is sound, a sandless technique restores the surface without a full sanding, at lower cost and with far less disruption. It isn’t right for every floor, but it’s worth asking about.
Making the New Finish Last
The finish you’ve just paid for is a wear layer, and how long it lasts depends almost entirely on what you do next.
Keep grit off the floor, because grit is what actually abrades a finish. Mats at every entrance do more for your floors than any product you can buy. Use felt under furniture legs, clean without soaking, and manage humidity through the heating season, since a humidifier keeps the boards from shrinking as far.
Sensible hardwood floor care isn’t complicated, and it’s the difference between sanding again in eight years and sanding again in twenty.
We’ll Tell You If Your Floor Even Needs This
Board thickness, refinishing history, whether the surface is solid or engineered, and whether the damage is cosmetic or structural all change the recommendation, and none of it is visible in a photograph.
We can tell you in a short visit whether your floor needs a full sand, a sandless restoration, or something more substantial, and we’ll tell you plainly if sanding isn’t the right answer. Visit our flooring showroom on Colonnade Road to see finished samples, browse our room scenes gallery, and review our our work portfolio for restored floors.
Ready to get started? Reach out for the flooring services ottawa homeowners trust, or call 613-274-7977 to schedule your free consultation.
